# Micro Challenge 02
Faculty : Santi Fuentemilla, Mikel Llobera and many more
***
## Form Follows Life
Using machine learning to analyze the movement of ants to influence the G-code and printing an object with clay, to codesign with nature.
### Things used in this project
**Software**
1. Rhinoceros 3D
2. Grasshopper
3. Firefly
4. Python
**Hand Tools and Fabrication**
1. Clay 3D Printer
#### Story
This project was developed at the Institute for Advanced Architecture of Catalonia (IAAC) as part of the Master in Design for Emergent Futures (MDEF) program.
Team members:
**Javier Serra** – [Website](https://javierserraa.gitbook.io/home)
**Maithili Sathe** – [Website](https://maithilis.gitbook.io/mdef-archive)
**Paula Rydel** – [Website](https://futuresdrafts.wixsite.com/paularydel)
#### 1. Introduction
For Microchallenge II, we were tasked with exploring the concept of intelligence, where an **input** is processed by an **intelligence system**, generating an **output**. Our project integrates **artificial intelligence** with **biological intelligence** by studying the movement patterns and communication of ants. We explore how both intelligences can collaborate and inform each other, using digital fabrication as a means of visualization.
By employing machine learning to analyze the movements and interactions of ants, we influence G-code generation for clay 3D printing. The result is an object co-designed with nature, returning to the ants the structure inspired by their movement patterns.
#### 2. Concept and system diagram
Our system captures the movement of ants and translates it into a printable form, following these key steps:
* **Tracking ant movement** – Recording the movement of ants through video analysis.
* **Image mapping in Python** – Using OpenCV to overlay movement data into a single image.
* **3D Surface generation in Grasshopper (Firefly + Rhino)** – Converting the image into a 3D surface.
* **G-code generation in Grasshopper** – Preparing the model for clay 3D printing.
* **Clay printing & returning to the ants** – Fabricating the structure and placing it back in the environment for the ants to inhabit.
The main principle of our design is preserving the pathways used by the ants, creating free-flowing zones while defining boundaries through negative space, ensuring their movement is unrestricted.
#### 3. Early experimentation
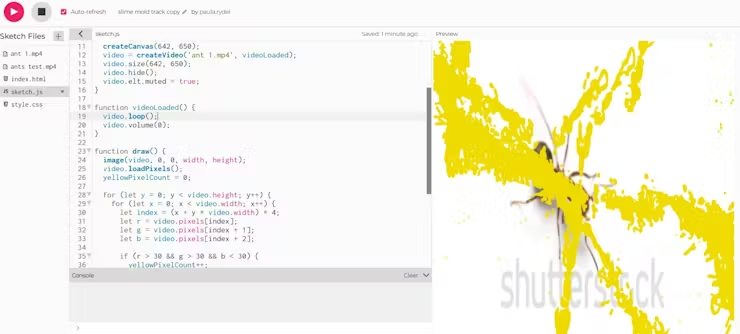
Initially, we explored P5.js for mapping ant movement, which resulted in a point cloud representation of their trajectories. We also attempted direct processing in Grasshopper using image-based mapping.
From P5.js-generated images, we used Rhino 3D and Grasshopper to create the desired regions, but the complexity of handling point clouds made it impractical. This led us to explore alternative methods, ultimately moving towards Python and OpenCV.
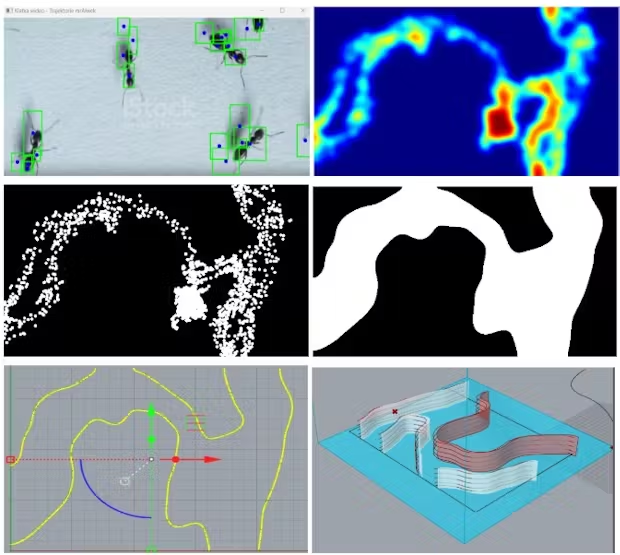
#### 4. Final mapping with Python & OpenCV
We implemented computer vision (OpenCV) in Python (executed via Visual Studio Code and Terminal) to analyze video footage of ants. Our workflow:
* **Input video** – A recording of two ants moving.
* **Processing** – Identifying ants as dark regions, extracting their centroids, and marking their movement.
* **Output image** – Overlaying frames to capture their continuous motion.
* **Initial output** – Sparse points representing movement.
* **Heatmap** (can have future aplications**)** – Showing frequency and dwell time.
* **Final overlay** – A continuous, unified region achieved through Gaussian filtering, merging individual tracks into a cohesive shape.
This final output serves as an ideal mapping of ant movements, which can be used in Grasshopper for surface generation.
Our goal was to automate the pipeline, eliminating the need for manual image processing. We attempted running Python directly within Grasshopper, encountering multiple challenges:
**Rhino 7 Issues:**
* Python scripting in Rhino 7 does not allow external libraries (like OpenCV) to be executed.
* Rhino 7’s Python interpreter uses a separate directory, requiring dependencies to be installed in its specific terminal.
**Remote Python plugin:**
* We explored Anaconda integration to call external Python scripts.
* However, OpenCV was still not accessible within Grasshopper.
**Rhino 8 improvements:**
Python scripting in Rhino 8 allowed us to execute OpenCV. We managed to install all the librarie and run script in Grasshopper, but the next step was to transfer the points to Rhino, instead of the OpenCV preview itself. Because of time, we decided to leave our prototype in two steps: first, where Python runs separately, generating an image, and second that is then processed in Grasshopper.
#### 6. From bitmap to contours
Using **Firefly** for Grasshopper, we processed the Python-generated bitmap:
* Inverting regions to highlight pathways.
* Generating a height-based mesh from brightness values.
* The result was a cliff-like terrain where white areas corresponded to raised surfaces, leaving ant pathways as lowlands.
However, as the bitmap was pixel-based and not vectorized, the mesh had an excessive number of faces, making it impractical. To address this:
* We applied Gaussian blur to smooth transitions.
* We sliced the mesh with an XY plane, extracting clean contour lines.
#### 7. Generating the final surface for G-code
To generate the G-code for clay 3D printing, we started from a pre-built Grasshopper definition that converts a surface into printable toolpaths.
However, Grasshopper did not recognize the contour extrusion as a valid surface, so we applied the following fixes:
**Simplifying contours**
* The extracted curves contained too many points, making processing difficult.
* Using `Rebuild Curve`, we reduced unnecessary points while maintaining shape fidelity.
**Surface recognition issues**
* Grasshopper initially failed to recognize the extruded form as a surface.
* After simplification, it successfully identified individual separate surfaces.
**Merging separate surfaces** (We explored two solutions)
* Creating a solid base for structural integrity.
* Adding an outer boundary to unify the shape.
#### 8. Printing test
We started prototyping with empty simulation and marker printing to check if everything was set up correctly before printing with clay.
#### 9. Prototype
Once everything was ready, we began testing different clay mix proportions for printing.
Mix #1: 500g clay + (30g + 5g + 5g) water added in steps
Mix #2: 500g clay + (40g + 3g) water added in steps
Mix #3: 500g clay + (34g + 5g + 3g) water added in steps
Mix #4: 500g clay + (42g + 8g) water added in steps
Mix #5: 500g clay + (42g + 5g) water added in steps (final one!)
That was 2 full day with checking various settings for speed and flow in 3d printer settings with the right consistency of mix, and proper way of filling clay container to avoid air pockets (important!). Anyway, after several clay explosions, the final prototype was successful with Mix #5.
### Reflection :
This micro challenge for me was the best of all three. The narrative was solid and there was a lot of learning during the three days. For me, learning to use grasshopper, computer vision, getting the gcode and using the clay printer, I had no prior experience in. I think it was packed with new experiences and I loved every bit of it. Working with Paula and Javi was also interesting, with Javi's knowledge abut 3d printing was very useful during the process.
I realized the amount of variables involved in this workflow. Right from material consistency, to filling up the cartridge the right way without getting too much air in, to then setting the speed and pressure right. All of this to get a nice simple print. I realized the amount of potential that this technology could have in my practice, it has made me curious about the mixing 3d printing with natural materials like clay. I think this microchallenge also informed the way I think about adaptive technologies while working with natural materials like clay. I'm sure I will take this forward in my practice, im not sure what form i would take but we will see!
###


.gif?alt=media&token=419bdaac-641b-474f-a7dc-01090bbb0547)
